The Art of Oribe - Testing a Classic
April 16, 2021
A few months ago I found myself looking into different styles of art for some new inspiration and that's when I discovered Oribe - a rich and glossy glaze used by the Japanese in the 16th century. Since then, many different types of glazes and patterns have developed. The most popular one is, of course, the green Oribe - ao oribe in Japanese. Its your classic glossy green glaze that can vary between emerald and moss. It tends to use shades of natural greens to reflect mountains and riversides. The designs are based on nature, geometric patterns, and sometimes a combination of the two. There is also black Oribe and Shino Oribe, both used in a similar manner and both with stunning characteristics.
Traditionally, green Oribe was made by blending a copper salt with feldspathic and wood ash glaze. It was applied by dipping, trailing, or ladling.. all simple and effective methods to achieve a dramatic effect. The dark line decorations that usually accompany this glaze were made from brown iron ore, and over this was a clear glaze consisting of a small amount of wood ash glaze with feldspar. Oribe is always fired in an oxidizing atmosphere since green copper would turn red in reduction.
Now that we've gotten through a small history lesson, I'll share some of my other notes on getting this glaze to work. Its still, for me, a work in progress since I'm hoping to find a recipe that has less crazing, but I started out with some basic recipes from glazy.org. The main recipes I tried all had roughly the same ingredients: nepheline syenite, silica, whiting, frit, and copper carbonate. I had to go through my notes from college and relearn all about fluxes and alkalines again, but the more I look into making my own glaze, the more its starting to come back to me.
So I made several recipes, tested them, and low and behold, they all had a far amount of crazing. Besides that, they looked pretty good though, so I was optimistic about continuing. The red iron oxide (RIO) wash is a simple mixture of red iron oxide and ball clay and was applied with a Japanese calligraphy brush.
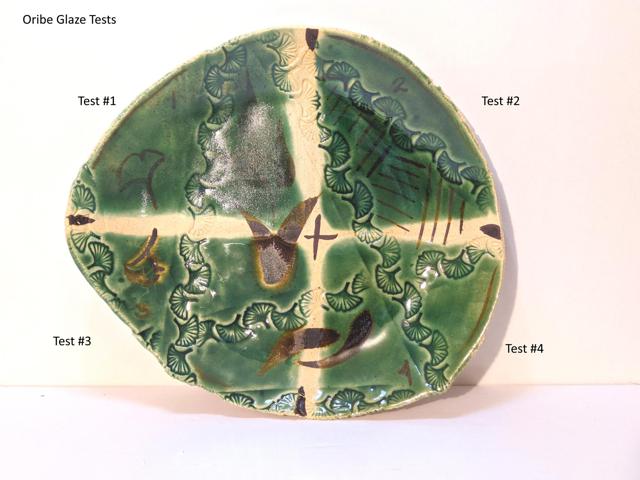
Here is the result of the first round of tests: (1) Not great. Maybe its the zinc? Satin sheen on all clay bodies and didn't react well with the RIO wash. (2) Really nice, and probably my favorite. It picked up texture really well, but there's some crazing. It looks good on dark clay bodies, too, but with some pin holing. RIO wash looks good under this one. (3) Glossy result with almost no crazing. Didn't play nice with the RIO wash though, and it wasn't super vibrant. (4) Glossy with some crazing, and it almost looks like some small crystals formed on the RIO wash.
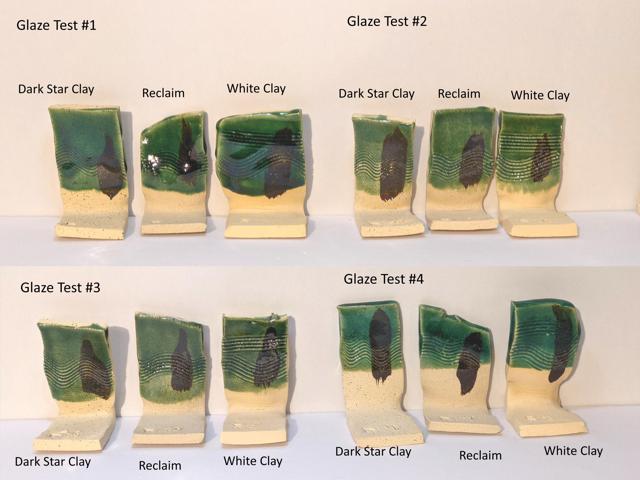
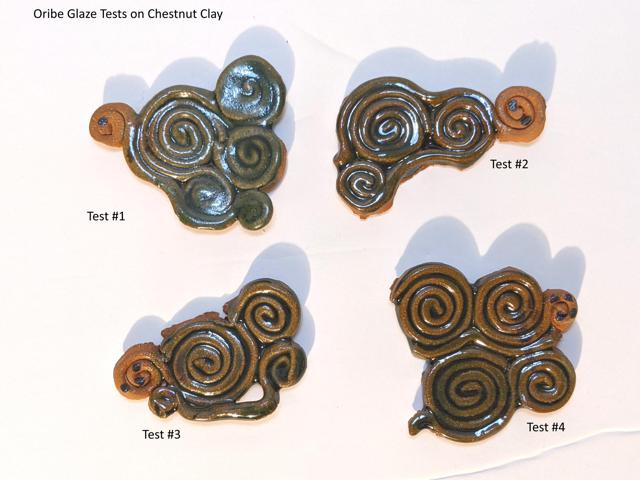
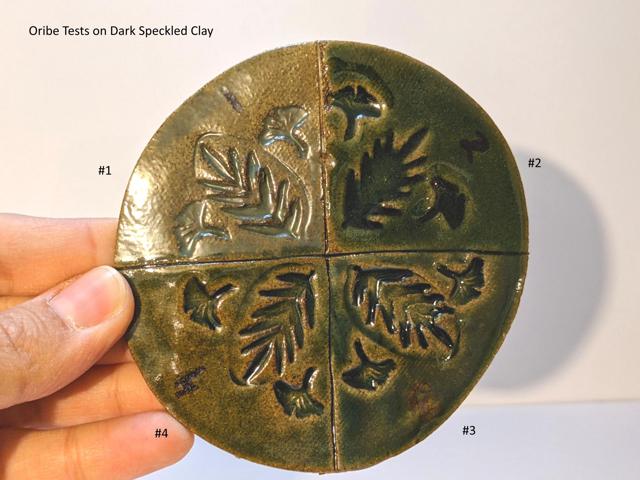
I also tested the glazes on different clay bodies, since some shrink at different rates. The results were about the same, and while it seems to fit the Chestnut clay body quite nicely, the color is much more muted.
These are the recipes I used. The first one is from Ceramic Art Daily, the second and third are from the glazy website linked above, and the last one is a variation of the second one.
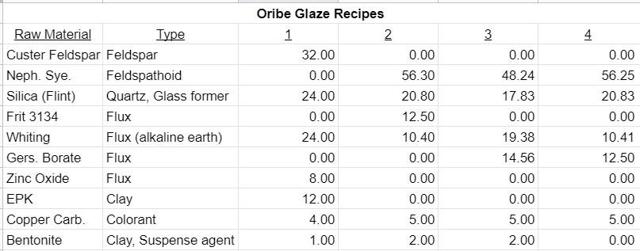
Conclusion: Overall, these were deemed successful tests. I can hear some pinging coming from the tiles, but nothing major, and most of my work pings. Some crazing is ok, but I really want to try to reduce it a little without losing the vibrant green. All tests after this were based off of test glaze #2 (only because the color was closest to what I was aiming for) and I varied the amount of flint to see if I could lessen the crazing. I also tried a couple other clay bodies I had lying around since some shrink more than others and that can also play a roll in getting a glaze to fit properly. So adding more flint in small amounts resulted in less crazing, although it never went away completely, but it also seemed to dull the green. Adding more copper carbonate (this is the chemical that give the glaze its green color) at this point would probably result in the glaze being less stable.. as of now, it doesn't drip, and I want to keep it that way, although I might test that someday. I also tried substituting the whiting with wollastonite, which didn't seem to make any noticeable changes.
I've put a pause on testing this glaze for now, but I don't feel as though I'm finished with it yet; other projects came up and for now its been put aside. I reverted back to the original glaze for the time being which I use once in awhile and I'm learning to embrace the crazing. I'll add updates here when and if I ever get back to perfecting the recipe, but for now I'm learning to be ok with it.
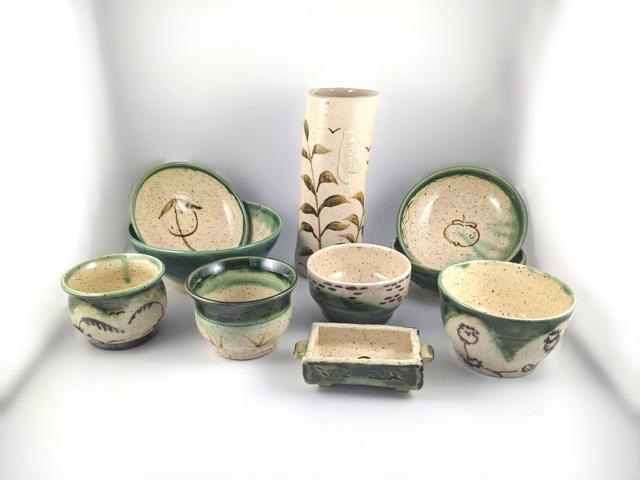
Some of my finished work using the 2nd Oribe test glaze. These will be available to purchase soon either through my website or at the Farmstead Show in May (see next blog for more details!)
Recent posts
- March 23, 2022 - Upcoming In-Person Shows for 2022
- Dec. 22, 2021 - Flowers on Everything
- Dec. 8, 2021 - Extruded Slab Building - Part 2
- Dec. 7, 2021 - Extruded Slab Building - Part 1
- Nov. 15, 2021 - Working Large Scale
- June 10, 2021 - Mayco Test Tiles - Two Triple Combos and a Stroke and Coat Test (Part 9/9)
- June 6, 2021 - Mayco Test Tiles - Sandstone, Muddy Waters, and Green Tea (Part 8/9)
- June 4, 2021 - Mayco Test Tiles - Norse Blue and Frosted Lemon (7/9)
- May 26, 2021 - Mayco Test Tiles - Coral and Copper Float (6/9)
- May 24, 2021 - Show Reflections
- May 19, 2021 - Mayco Test Tiles - Cenote (Part 5/9)
- May 16, 2021 - Mayco Test Tiles - Landslide (Part 4/9)
- May 7, 2021 - Mayco Test Tiles - Himalayan Salt (Part 3/9)
- May 5, 2021 - Mayco Test Tiles - Azurite (Part 2/9)
- May 3, 2021 - Mayco Test Tiles - Rainforest (Part 1/9)
- April 19, 2021 - Upcoming Art Shows
- Feb. 11, 2021 - First Blog Post - Welcome!